The Wicked Rose Co.
What Happens At The Cabin Vinyl Window Decal
What Happens At The Cabin Vinyl Window Decal
Couldn't load pickup availability
Share
What Happens At The Cabin Vinyl Window Decal
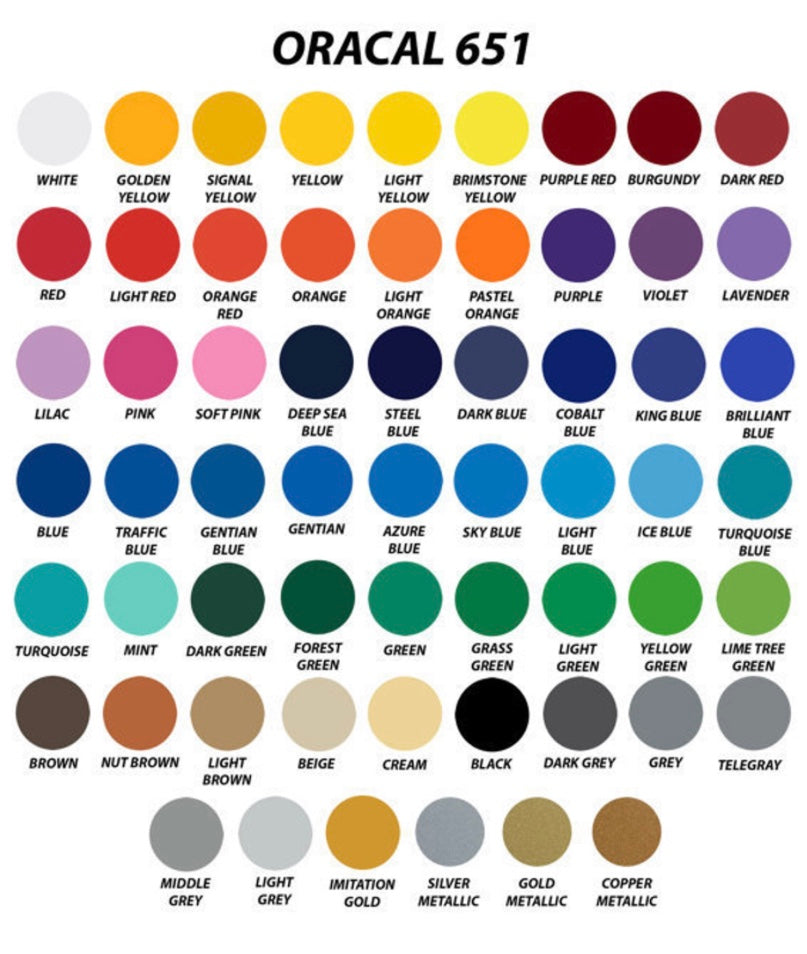
PLEASE INCLUDE THE COLOR OF THE VINYL YOU’D LIKE YOUR DECAL IN, IN THE NOTES SECTION OF YOUR ORDER!! IF YOU FAIL TO DO THIS, YOUR DECAL WILL SHIP IN WHITE!!
This decal is made with Oracal 651 Permanent Vinyl. Oracal is rated for 6+ years outdoors. I had a bunch of decals made for a craft fair and these are ones that didn’t sell! I’m trying to clear out some inventory to make more stuff!
VINYL DECAL INSTALLATION INSTRUCTIONS:
1. Clean your desired surface with rubbing alcohol ONLY!
2. Place decal face down and slowly begin to pull backing away from the transfer tape.
a. If parts of the decal stick to the backing when lifting from transfer tape, push backing back down and use a scraper or an old card from your wallet to rub over the decal in those places. Repeat step number 2.
3. Once you get the decal off the backing, carefully place decal on clean, dried surface,
4. Once in place, use a scraper/old card to smooth it out, applying pressure to the decal as you do.
5. SLOWLY begin to remove top layer of transfer tape by pulling AT AN ANGLE.
a. If parts of the decal stick to the transfer tape, lay the transfer tape back down and use your scraper/old card ad go back over the decal, applying more pressure as you do. Make sure you focus on the spot that isn’t sticking to the window. Repeat step number 5.
6. Once your decal has successfully been transferred to surface, let cure for 2 DAYS!!
IMPORTANT NOTES:
1. You might notice bubbles in your decal. Please allow 2 days (with warm temperatures) for decal to fully cure before worrying about bubbles.
2. DO NOT SPRAY WATER DIRECTLY ON DECAL DURING CURE PROCESS!
3. DO NOT apply decal unless temperatures are above 45 degrees!! Decals do NOT like to stick when windows are cold.
4. Please DO NOT use anything but rubbing alcohol when cleaning surface. Most cleaners have extra additives that counteract the adhesive of the decal, not allowing it to stick.
Thank you for supporting my small business!!


